Projects' Directions
Follow the following example when setting up your project tab:
Date: 08/08/18
Glider
|
Interest in reaching the skies existed long before the Wright Brothers made their monumental flight. For two thousand years kites have been used for various reasons including measuring distances, testing wind conditions, lifting people in the air, and even developing the first aircraft. Today, kites are still used extensively for practical and entertainment purposes. In addition to the age-old kite is the rocket which has allowed humans to study aeronautics for over a thousand years. Rockets employ very similar forces and principles to those of airplanes. These forces include lift, thrust, weight, and drag which will be explained in later units. The first form of a rocket came from the Greeks and was developed by Archytas as a steam powered wooded pigeon that would "fly". Steam escaped from within the pigeon and propelled it along a wire. Over time, different cultures integrated their knowledge into rockets and applied a variety of developments. Such developments include the use of gun powder by the Chinese in their rockets, creating a move from steam powered to solid-fuel rockets.
As time moved on, humans continued to study how things fly and by the 1700's, man had developed balloons which used hot air to rise. By 1783, a balloon was developed that could lift passengers using hot air or hydrogen. From here, developers redesigned balloons to include rudders and propulsion to construct dirigibles also known as airships. These airships use controllable flight to reach a variety of destinations, and were widely used to carry passengers. All of these major steps ultimately lead to the first human flight in an airplane.
Day 1 & 2: We planned and did the research on the glider. Day 3& 4: We finished the research and started the engineering part. Day 5 & 6: We were doing the research part then we became stuck in a trap trying to fix and get our glider in spec. Day 7& 8: We putted our project together and glued everything together. |
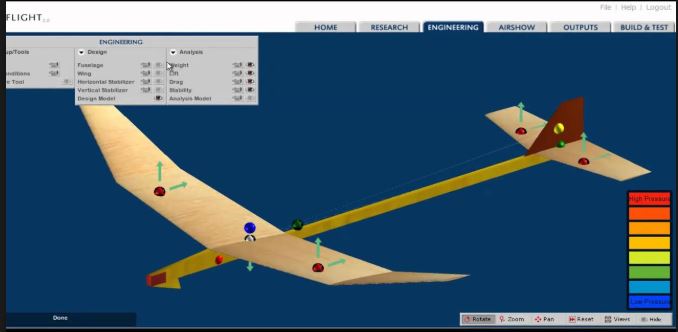
Our first building process was on Whitebox Learning. Whitebox learning gave us a good place to build and design out gliders but was not very realistic. Whitebox build the gliders perfectly without any human error. Many of the tips I used were from the worksheets and readings we read. One of the best ones was to taper or round your wings. This greatly improved the performance of the glider, and was much better than the square wings. One difficulty I faced was that I did not know that we were allowed to change the ballast from the default 1.8 grams. This made my glider too heavy and it only would fly around seven seconds. Whitebox was also very helpful in that it gave us blueprints that were very easy to use and understand. Some advice I have is that moving the wings around on the glider is essential to having a good glider. When I first started building I had no idea you could move the wings backwards and forwards so my glider flew less than one second. Once I moved the wings back my glider became much better and flew way farther. In real life the gliders were much different. It was hard to build them and get the dihedral of the wings correct. Overall, I think we did a fairly good job of building the two gliders in real life.
When we started building our first glider we realized that our glider was not nearly as good as the computer had made it. We put our wings too far back as you can see in the first picture. Glider one did not do so well, our flight time was 2.51 seconds and our distance was only 24 feet. Our second glider was a great improvement over our first. It flew 6.24 seconds and 47 feet. That is 3.73 seconds better and 23 feet farther! When we would launch our second glider it would have a perfect flight for a few seconds then it would dive down and start doing flips and spirals. On our best flight it flew up and then it started going down and doing flips, but just before it his the ground it leveled back out adding about a second to our flight time. The one thing we changed between glider one and glider two was we moved the wings farther up. This was a very obvious change to make and that is why we changed it. Also on the second glider we tried out the spray glue and that seemed to hold the glider together better.
There were many parallels between the process we experienced and the process the BCMA experienced in Rocket Boys. My first glider barely flew a second and that is similar to how Sonny’s first rocket blew up on the spot. This parallel continues in that my gliders slowly got better and their rockets slowly got better also. We both experienced trial and error. Our first tests did not do so well so we tried different things until we found something that worked. I learned very much in doing this project and I hope we do something similar to it later this year.
11/29/18
Greeting Card Project Samples
|
You will be making a greeting card
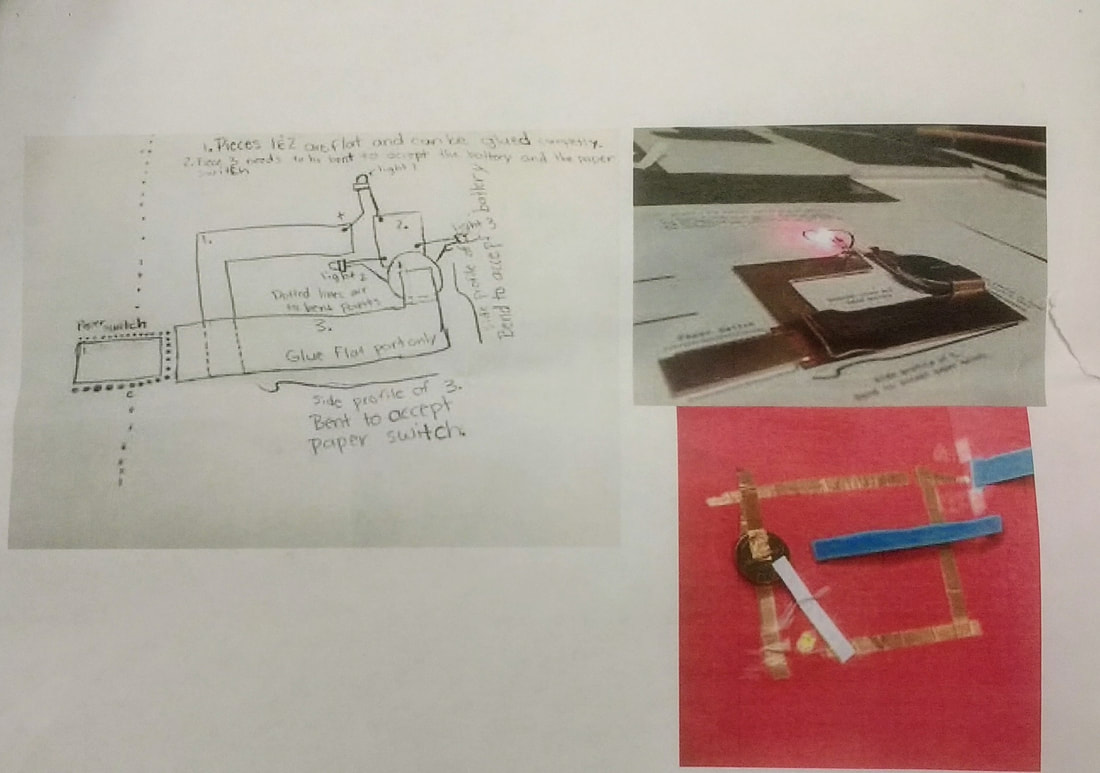
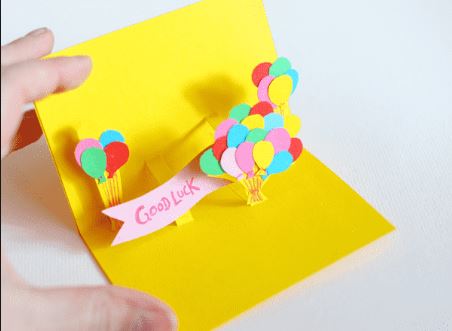
Refer to the scoring rubric located on the assignment sheet for how this project will be graded Required elements Greeting card template and writing must be done using Inkscape Program follow instruction sheet How to create a custom greeting card in Inkscape on the assignment sheet for details Front Cover with text and artwork Inside of card text - Turned into assignment on HUB and on Card Original writing Minimum of one paragraph / 5 complete sentences (See example below) Write a one paragraph message to the recipient of your greeting card. one paragraph should consist of 5 sentences including an introductory or topic sentence three body or supporting sentences and a concluding sentence. A complete sentence begins with a capital letter and ends with an end mark. Each sentence should contain at least one main clause consisting of a subject and a verb. Each sentence of the paragraph must express a complete thought. Minimum of 3 fonts used - should compliment each other Pop Up Art - card must have a pop up feature - follow instruction video How to make a basic pop up card and How to make a basic pop up card using a Trotec laser and Inkscape Lights Fundamental class students must have one working light All other classes must have at least two working lights Back cover must contain first name, last name, instructor and class period Expectations Effort is made towards a professional product Artwork is original or greatly altered using art program All writing is original (no cut and paste) Include on Weebly Project Tab: Theme of card Who your card is for and why Timeline of project including daily photos of progress Sketch of card design plan Sketch of wiring / wiring diagram Samples of fonts used and why selected Samples of colors used and why selected Final product photos Final product Video showing all parts of card and how it functions Bonus Opportunities Use the laser effectively on card Use other shop equipment to enhance card Include a professional logo on back of card Add sound to card Other bonus upon approval |
Sample of Inside Text (Written by Spoony)
Goodbye to 2018
Mom and Dad, you have been with me through all the highs and lows of 2018 and now it is time to say goodbye to this year and prepare for what 2019 will bring us. As I reflect on 2018 and remember all the trials that presented themselves to our family I am thankful that I did not have to face them alone, I always have you there ready to assist and support me no matter what the challenge. I am so blessed to have a loving family that is always ready to join me in a big ole belly laugh or a good and sometimes much needed cry. I am aware that every storm has a reason either correcting or perfecting and I can always count on your wise counsel to help me sort out the reason and next steps in my life. So as we finish out 2018 and make our way into the new year let’s remember to count it all joy and look to 2019 with great anticipation for the joys to come.
